
3 Ways to Get the Shot Without the Gear | Cell Phone Photo Tips

Hey friend! I’m switching gears on the blog today to share some education with you. I’m going to combine my three favorite things: teaching, math, and photography! As you likely know, photography is expensive. A nice camera can easily cost $1,000+ and depending on the variety and quality of lenses that you want, you could easily drop a few grand on lenses too. So how do you get the picture you want without spending a fortune? Keep reading for three photo tips for improving your pictures with no more than a cell phone.
3 Photo Tips for Taking Pictures with a Cell Phone
(1) Have your subject face their shadow.
This first photo tip might seem counterintuitive, but stay with me. Raise your virtual hand if you’ve ever had your picture taken while you’re facing the sun. *All hands go up.* It’s terrible, right? Your nose scrunches, your eyes squint and maybe even start watering, all of which makes the smile on your face look less natural. Plus, your nose and chin are casting harsh shadows on your face and neck, which could be happening at other parts of your body too. Perhaps your arm is casting a shadow on your torso. This combination doesn’t make for a great photo.
If you flip around though, now the sun is hitting the back of your head and even if it is bright out, your eyes are more relaxed because you aren’t looking into the sun. Additionally, the entire front of your body is evenly lit because there aren’t shadows being cast from other body parts. Even though you may be dark in a picture because you aren’t facing the light source, you won’t have different kinds of light smattered across the front of your body. Plus, you’ll learn in Tip #3 how to handle those shadows!
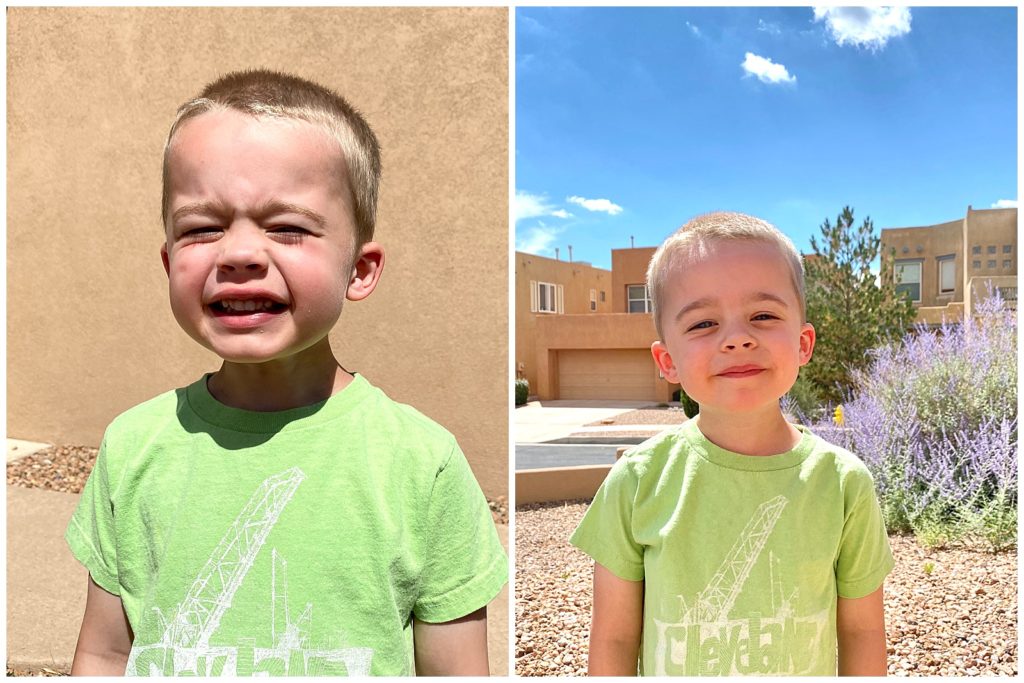
Consider the following example. These photos were taken at about 3:00 PM in the harsh afternoon sun. If the photo on the left doesn’t illustrate my point about facing the sun, I don’t know what will! This little guy is evenly lit and much more relaxed in the photo on the right where he is facing his shadow. 180-degrees makes a big difference!
(2) Don’t shoot directly into the sun.
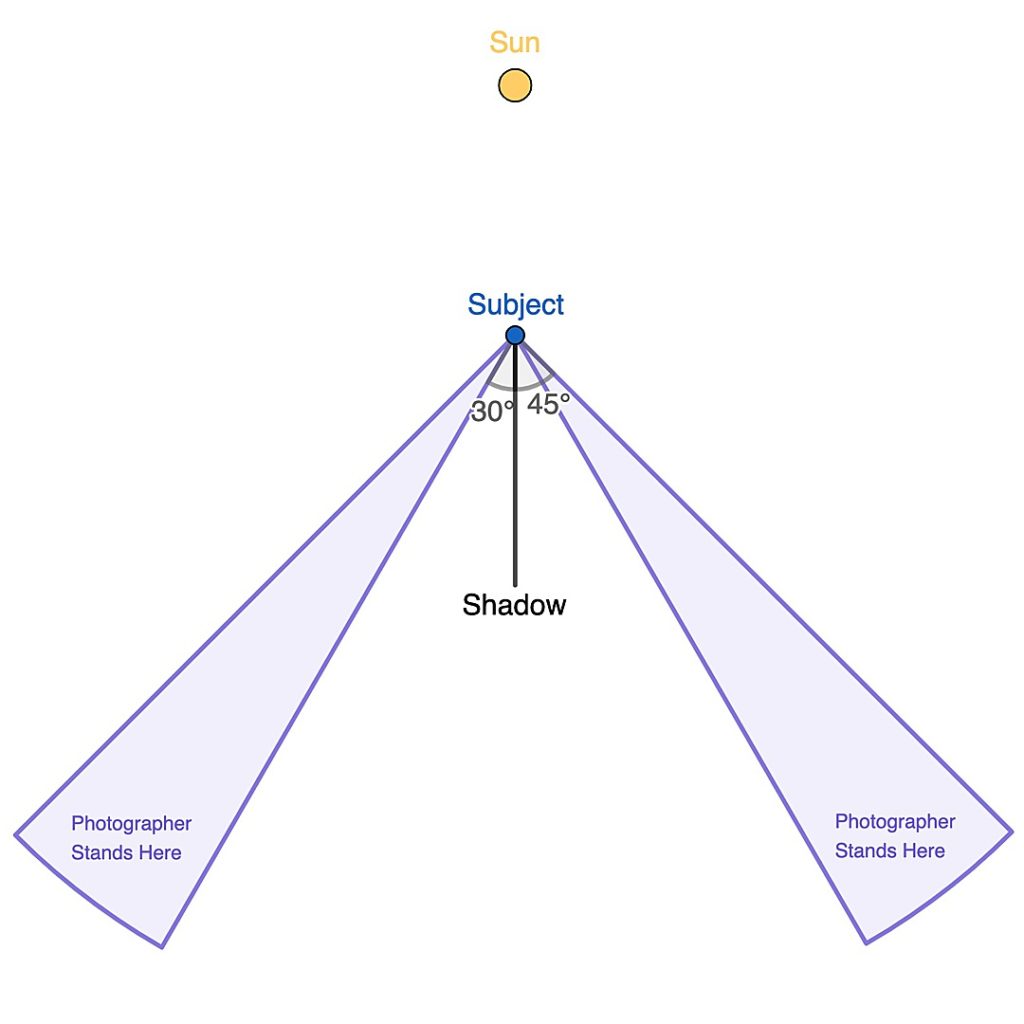
We’ve established that we want our subjects to face their shadow, but then we want to position ourselves a bit to the side so that the sun isn’t coming directly into the camera. For those of you who love math as much as I do, I recommend offsetting yourself between 30- and 45-degrees. Why do we do this? Well, if you like lens flare, then you can ignore this tip and move on to the next one. However, if you’re like me and prefer to have images without lens flare, this is what you can do to prevent that.
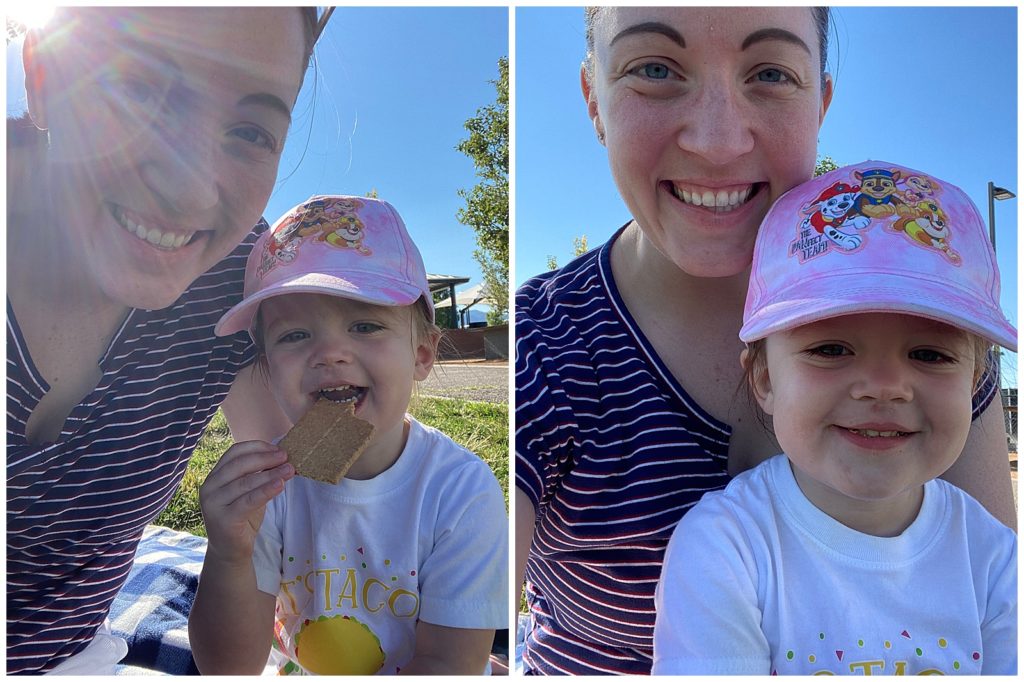
Consider the selfie below of my daughter and me. The sun is behind us in both images, but in the first one, the sunlight is creeping into the lens. I could have repositioned my head to block the sun, but instead I moved my phone about 30-degrees and took the second shot. Moving the camera just a bit makes a huge difference!
(3) Utilize basic editing
Once you get the shot, there are some very basic edits that you can make to make a substantial difference in your photo. You can start with a simple crop/straighten and then move into some of the more detailed settings. The point of this post isn’t to give you a full explanation of all the options you have, but I will point out the ones that I believe are the most critical:
- Exposure – Increasing the exposure of the photo will brighten the image, while decreasing the exposure will darken it.
- Shadows – Increasing the shadows will brighten just the shadows of the image, while decreasing the shadows will darken them. This is a great way to brighten the front of your subjects when their backs are to the sun.
- Warmth – Increasing the warmth (also know as warming up your image) will move the temperature toward yellow, while decreasing the warmth (or cooling down your image) will move the temperature toward blue. When you take a picture in the shade, warming up your image will make a big difference.
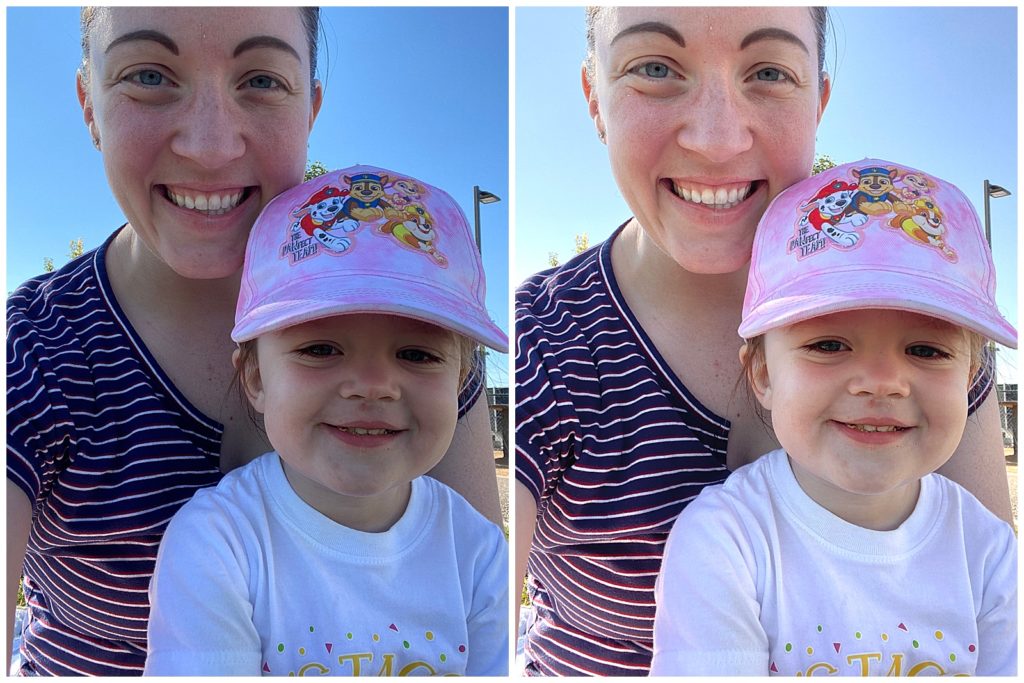
Programs like Adobe Lightroom have what feels like infinitely more options when it comes to editing, but the options that you have on your cell phone can make a significant difference. Consider the same selfie I showed in the last tip and notice the difference between the original and the one that was edited with my iPhone. With just a few adjustments, the image is a bit brighter, our skin tones are less blue, and my daughter’s shirt is a brighter white.
Recap
If you can remember when you’re shooting to have your subject face their shadow and then rotate yourself a bit so that the sun isn’t shining directly into your camera, I think you’ll notice a big difference in your photos. From there, utilize a few of the editing options that your phone offers to further improve your images.
I hope these photo tips were helpful! Please feel free to reach out via my contact form or email me at erin@erinthompsonphoto.com if you have any questions. I love to teach and I love photography, so I’d be happy to chat with you!

YES PLEASE!
Getting ready for your next PCS? This resource is for you! Download the guide for five actionable ways to set yourself up for success at your next assignment.
5 Ways to PCS-Prep your photography business
Getting ready for a PCS?
Getting ready for a PCS?


free download!
I HAVE A LITTLE SOMETHING FOR YOU!
I've been navigating military life with my family since 2008. In that time, I went from a full-time classroom teacher to an online course designer to a photographer. Actually, I still teach a little math on the side because I just love it too much!
Through it all, I've discovered how passionate I am about connecting with military families. Whether it's taking photos at a retirement ceremony, coaching a fellow milspouse photographer, or just grabbing coffee with a new squadron friend, I love this community. And as a teacher at heart, I'm excited to use this space to share what I've learned about business and life with you.
I'M ERIN.
Hey there!


