The Very Beginning | What Is ISO?
Welcome back to The Very Beginning! In this series, we have been exploring the fundamentals of photography, from understanding aperture to mastering shutter speed. Today, we’re diving into the last piece of the exposure triangle, ISO. Once you understand these settings individually, we’ll discuss how to put them all together to create a properly exposed image. So let’s dive in!
What is ISO?
ISO (pronounced either “ice-oh” or “I-S-O”) measures the sensitivity of your camera’s sensor to light. It’s derived from film photography when different film stocks had varying levels of sensitivity to light. In the digital world, it serves a similar purpose but with a twist – it amplifies the signal from your camera’s sensor to make it more or less sensitive to light.
How to Control ISO
ISO settings are expressed as numbers like 100, 200, 400, 800, and so on. Here’s what you need to know:
- Low ISO (100 to about 400): Low ISO values make your camera’s sensor less sensitive to light. These settings are ideal for bright, well-lit conditions, such as a sunny day, where there is a lot of light around you. If I’m shooting outdoors on a bright day, I set my ISO around 200.
- Moderate ISO (400 to about 1000): Moderate ISO settings strike a balance between light sensitivity and image quality. As we’ll discuss in a minute, too high of an ISO creates digital noise in an image. In this moderate range that I would use on a cloudy day or inside a well-lit home, I do end up with some noise. However, it is generally minimal and easily fixed with the Manual Noise Reduction sliders in Lightroom.
- High ISO (above 1000): High ISO settings increase sensor sensitivity, allowing you to shoot in low-light situations. I generally use a high ISO when I’m doing a lifestyle newborn session or indoor military event. Many times I pair this with a low-powered flash to ensure that my images aren’t too dark, as that will lead to noise when I brighten them in post-processing.
Watch Out!
As I mentioned earlier, the higher the ISO setting, the more digital noise (think of static on a TV) you’ll introduce in your images. It’s hard to see on the tiny screen on the back of your camera, but you’ll definitely notice it on your computer screen. To mitigate noise, I suggest using the lowest ISO setting that allows you to achieve the desired exposure.
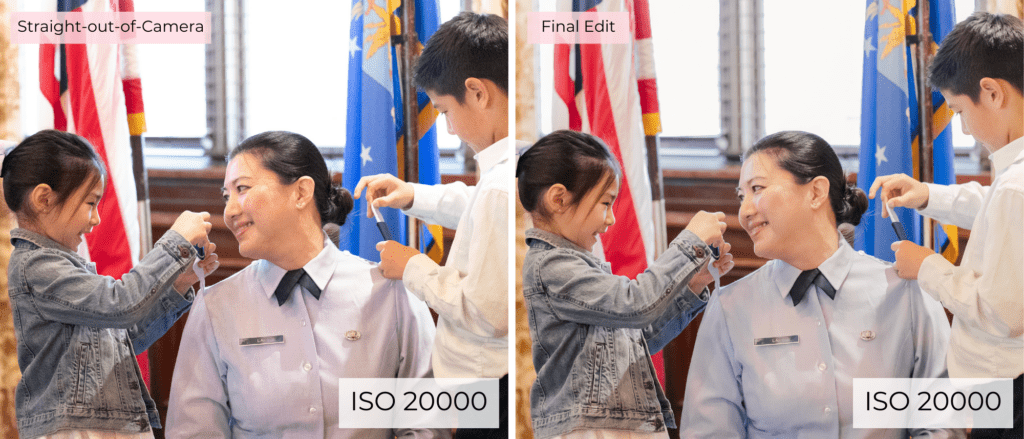
There is some good news on this front. As camera technology has improved, so has the ability to push to higher ISO settings without over-doing the noise. On my mirrorless Canon R6, as long as I get the entire photo exposed properly so I don’t have to increase the shadows dramatically in Lightroom, I can push my ISO to numbers I never would have dreamed of on my DSLR. On the DSLR, I avoided going above 1600 at all costs. However, on my R6, I’ve shot as high as 20000 and have been able to maintain reasonable detail without too much noise. (See example below.) This was only possible because I properly exposed the image in camera and didn’t have to brighten it significantly in post-processing.

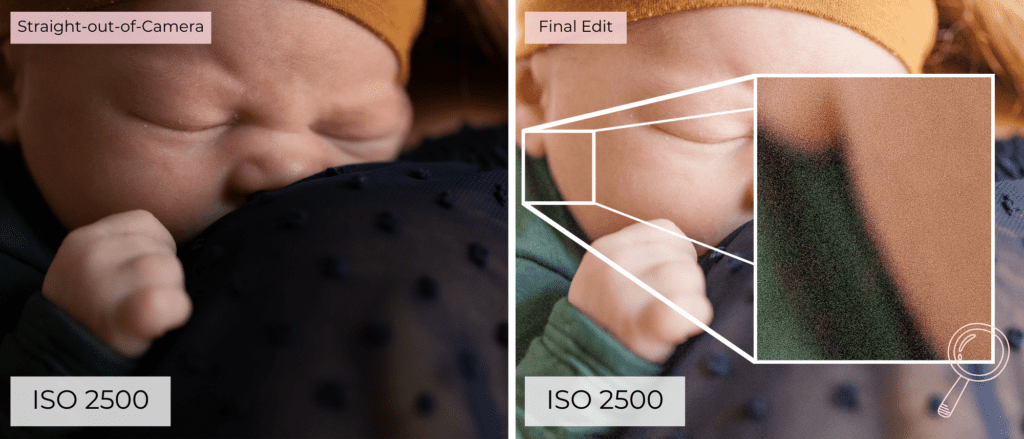
Noise becomes most apparent in the shadows of an image when you brighten them in post-processing. (See example below, especially the boxed area that was particularly dark straight-out-of-camera.) To avoid this, it is crucial to expose your image properly in camera. If you can’t justify increasing your ISO any more because of noise, try decreasing your aperture and/or shutter speed if possible to let in more light. If you’re maxed out on all these settings, then it may be time to learn flash. But that’s a blog post for another day!

Recap
ISO is the final piece of the exposure triangle that controls how sensitive the camera’s sensor is to light. You want to keep it as low as possible to minimize noise, but that requires you to know your equipment. I would suggest playing around with your ISO and getting a feel for how high you can take it while keeping the amount of noise where you’d like.
What’s Next?
Up next in The Very Beginning, we’ll look at one more manual setting that I like to use, Kelvin. This is the manual approach to white balance. While it doesn’t impact overall exposure, getting it right in camera can help you make other adjustments more easily. Plus, it makes editing faster!
If you have questions or need guidance along the way, please let me know in the comments below or send me a DM on Instagram. I’d love to chat!
If you enjoyed this post, you may also love:

YES PLEASE!
Getting ready for your next PCS? This resource is for you! Download the guide for five actionable ways to set yourself up for success at your next assignment.
5 Ways to PCS-Prep your photography business
Getting ready for a PCS?
Getting ready for a PCS?
free download!
I HAVE A LITTLE SOMETHING FOR YOU!
I've been navigating military life with my family since 2008. In that time, I went from a full-time classroom teacher to an online course designer to a photographer. Actually, I still teach a little math on the side because I just love it too much!
Through it all, I've discovered how passionate I am about connecting with military families. Whether it's taking photos at a retirement ceremony, coaching a fellow milspouse photographer, or just grabbing coffee with a new squadron friend, I love this community. And as a teacher at heart, I'm excited to use this space to share what I've learned about business and life with you.
I'M ERIN.