
The Very Beginning | What Is Kelvin?

Welcome back to The Very Beginning! In previous posts, we’ve explored the three foundational settings we can control in manual mode: aperture, shutter speed, and ISO. Today, we’re taking things one step further and exploring the manual approach to white balance using Kelvin.
What Is White Balance?
Before we dive into Kelvin specifically, let’s start by defining white balance. Depending on the light in a situation, color tones can vary from cool (blue tones) to warm (yellow tones) causing whites to not appear “white”. So how do we fix that? We adjust the white balance, the camera setting that establishes true white so that the remaining colors in the image render accurately. Essentially, we tell the camera what “white” looks like in the given light and the rest of the colors adjust accordingly.
When considering white balance, we have three options. We can use auto white balance (AWB), preset white balances, or Kelvin. As it suggests, when shooting in AWB, the camera chooses what it thinks is true white. Sometimes it’s accurate, sometimes it’s not. Presets offer a little more flexibility as you can tell the camera what kind of light you’re in. Still, you won’t always get consistent readings. If you want more control over your images, it’s best to tell your camera what true white is. You do this by shooting in Kelvin.
How to Control Kelvin
The Kelvin scale ranges from around 2000 to 10000. You will choose the setting based on the light around you.
- Low Kelvin (below 5000): A low Kelvin number cools down your photo. You’ll use a setting like this in very warm light like during a glowy, golden-hour sunset or in an indoor setting with warm ambient light.
- Midrange Kelvin (5000 to about 7000): Midrange Kelvin values are often used in bright mid-day natural light conditions and through the start of golden hour. This range is where I find myself the vast majority of the time.
- High Kelvin (above 7000): High Kelvin numbers warm up your photo. I rarely find myself in this range though, mostly because I don’t consider this “great light” for my personal style. However, I push to this range during blue hour (the hour before sunrise/after sunset) or during in-home newborn sessions with very cool window light.
I find it easiest to think about the balance required here. You’ll cool down the warm light around you with a lower Kelvin setting and you’ll warm up the cool light around you with a higher Kelvin setting. Here are a couple examples. Notice how similar the whites look in each photo despite me shooting in very different light.
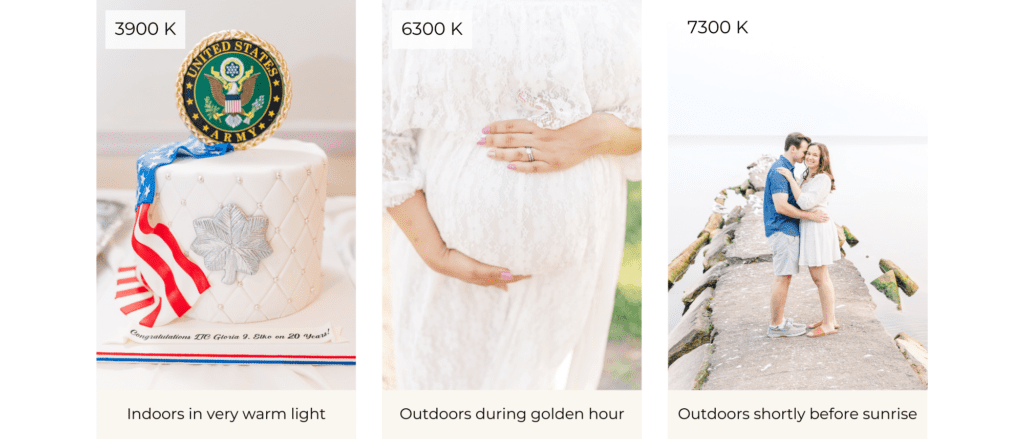
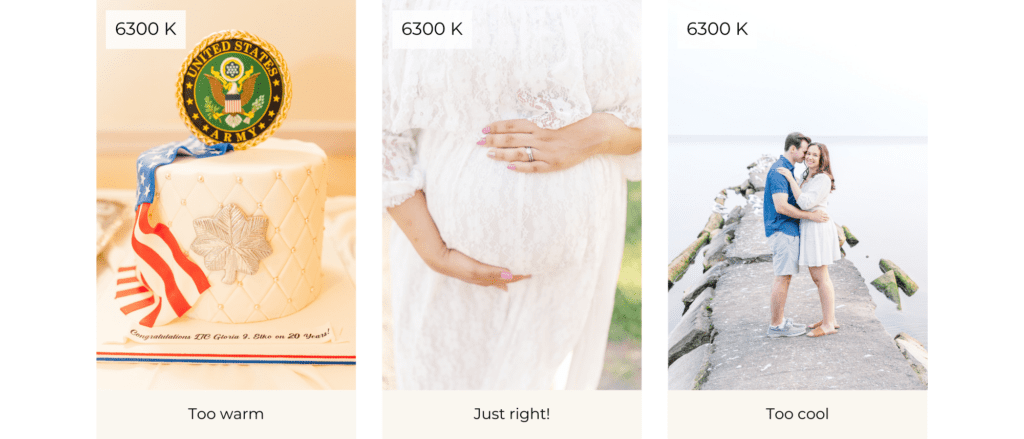
For reference, here’s what the whites would look like all at 6300 K, a typical setting for the start of a golden hour shoot.
Watch Out!
There’s good news here! While messing up aperture, shutter speed, or ISO in camera can ruin a photo, if you shoot in Kelvin, you basically can’t mess up white balance as long as you’re shooting in RAW! Even if you totally miss it in camera, you can manually adjust the white balance slider in Lightroom to bring it exactly where you need it to be. This is not true of shooting in AWB though, so consider this another reason to give Kelvin a try!
Speaking of AWB, while it can be convenient, it doesn’t always get it right. And what’s worse than not always being right, it’s also not always consistent! This can be a huge pain when it comes to editing. Plus, it’s hard to compare images side-by-side straight out of camera when the white balance is inconsistent.
Recap
If you’re going to take the time to learn how to control aperture, shutter speed, and ISO, I believe you should throw white balance into the mix as well. It’s just one extra tool that you can use to achieve the look that you want. Plus, Kelvin mistakes are easy to fix in Lightroom if you’re shooting in RAW, so there’s really no reason not to give it a try!
What’s Next?
Next week is a big one! The next post in The Very Beginning will bring together all the elements we’ve explored so far – aperture, shutter speed, ISO, and now Kelvin. I will explain how they all work together and how I go about adjusting my settings every time I take out my camera.
So, grab your camera, play around some more with each of these settings, and send me your questions! You can drop them in the comments below or send me a DM on Instagram. I would love to help you!
If you enjoyed this post, you may also love:

YES PLEASE!
Getting ready for your next PCS? This resource is for you! Download the guide for five actionable ways to set yourself up for success at your next assignment.
5 Ways to PCS-Prep your photography business
Getting ready for a PCS?
Getting ready for a PCS?


free download!
I HAVE A LITTLE SOMETHING FOR YOU!
I've been navigating military life with my family since 2008. In that time, I went from a full-time classroom teacher to an online course designer to a photographer. Actually, I still teach a little math on the side because I just love it too much!
Through it all, I've discovered how passionate I am about connecting with military families. Whether it's taking photos at a retirement ceremony, coaching a fellow milspouse photographer, or just grabbing coffee with a new squadron friend, I love this community. And as a teacher at heart, I'm excited to use this space to share what I've learned about business and life with you.
I'M ERIN.
Hey there!


