
The Very Beginning | How to Shoot in Manual Mode

Well, friend. This is it. We covered the exposure triangle (aperture, shutter speed, ISO). We talked about white balance (Kelvin). Now it’s time to see how all these pieces work together. I remember feeling overwhelmed when I was first learning because I didn’t have a system for adjusting my settings. If my picture didn’t turn out the way I wanted, I would change a few things and try again. But then oftentimes that didn’t work either and I was left feeling frustrated. After years of practice, I now have a consistent approach that I use every time I take out my camera. I’m excited to share it with you here so you can learn how to shoot in manual mode!
Getting Started in Manual Mode
For starters, I highly recommend utilizing aperture priority or shutter priority modes on your camera. These are marked A or Av (aperture) and S or Tv (shutter) on your camera, depending on the brand and model. You’ll find them on the camera mode dial next to M (manual).
These modes are a step between automatic and manual. In aperture priority, you tell the camera what you want the aperture to be and the camera will automatically set the other settings. It is the same in shutter priority, except you set the shutter speed. When you’re doing this though, don’t just set the setting you want and ignore the rest. This is a great opportunity to see how the camera adjusts the other settings for proper exposure. As you start to notice overall patterns and trends, you’ll feel more confident transitioning to full manual mode.
A Little Story…
I’d be remiss if I didn’t share a story here because it was a pivotal part of the learning experience for me. Picture this. My husband and I are newly married, living in Montana, exploring in the mountains. I wanted nothing more than to see a moose, so we went for a drive in an area known for these gigantic creatures. Matt was driving, I was riding up front with my camera in hand. Aperture priority was set and I was ready to capture an epic moose shot with a beautiful blurry background.
After a bit of driving, believe it or not, a young moose ran across the road right in front of our car! We lost sight of him within seconds as he ran into the trees, but we saw him and I snapped a picture… and the background was blurry all right! (I’m still sad about this nine years later!!)
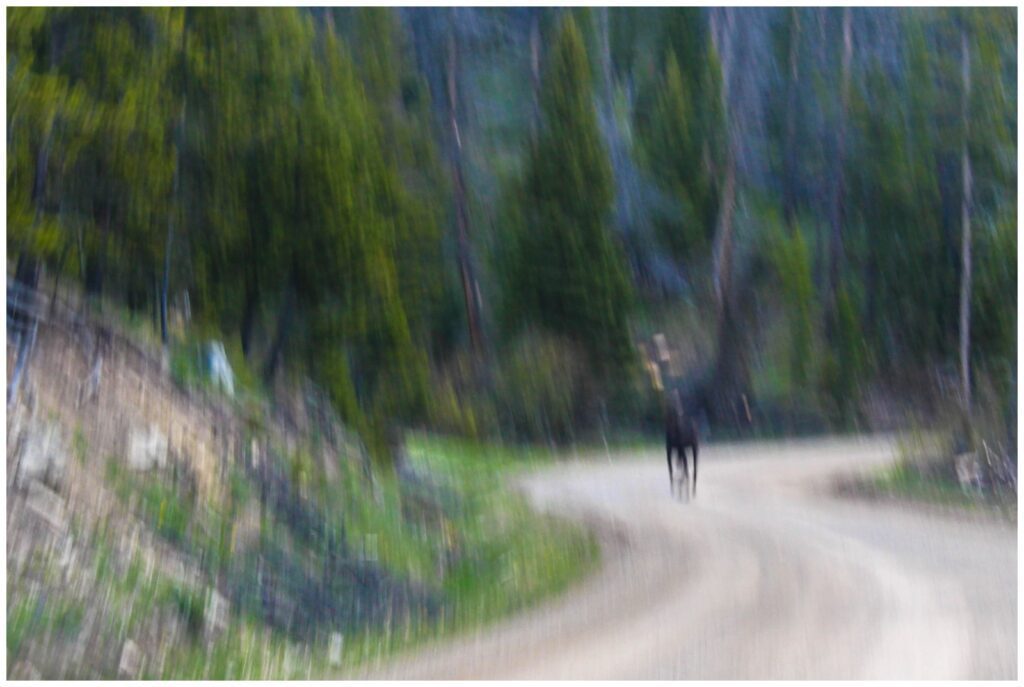
So, what the heck happened here!? Well, I told the camera that the priority was an f/11 aperture (mistake #1). Because it was a cloudy day and we were in the forest, a slow shutter speed was necessary to achieve proper exposure. The shutter was open for 1/20 of a second which was way too long to freeze the motion of a running moose and eliminate camera shake from my excited hands, hence the blurry picture. Instead, I should have been in shutter priority mode, telling the camera that the shutter speed should have been at least 1/400 of a second. The camera then would have decreased the aperture and/or increased the ISO for proper exposure.
What’s the moral of the story here? Think about the situation, decide which setting is actually the priority (spoiler alert: it’s not always a pretty blurry background… which you’re not going to get at f/11 anyway!), and choose accordingly!
Tackling Full Manual Mode
If you’re ready to fully learn how to shoot in manual mode, let me offer some advice. If you take a picture and the exposure isn’t right, don’t change more than one setting at a time! That will make it challenging to see what the fix was and replicate it later. Here’s the process I use every time I take out my camera for portraits:
- Kelvin – Using the light around me, I set my Kelvin so that my whites look white. Unless the light changes dramatically, I won’t need to adjust this again.
- Aperture – Since I love a beautiful, blurry background in my portraits, I set my aperture before shutter speed and ISO. I consider the pose that my subjects are in and set the aperture as low as possible while ensuring everyone is in the focal plane.
- ISO – After setting aperture, I set my ISO as low as I can to minimize noise.
- Shutter Speed – Finally, I use shutter speed to finalize proper exposure. On a very bright day, sometimes I use a very fast shutter speed not because I need to freeze motion but because I need to let in less light. On an overcast day, my shutter speed is often much slower.
Now, do I always get my settings right on the first try? Of course not! When this happens, I work backwards through the list. If I can’t slow my shutter speed down anymore, then it’s time to revisit ISO. If I don’t want to increase my ISO anymore, then I may need to decrease my aperture. And if that isn’t an option, then I know it’s time to introduce flash or change locations. (That said, that almost never happens in a normal family session.)
Back-of-Camera Cheat Sheet
Whew! If that felt like a lot of information, well, you’re right! It was! To help you make sense of it, I’ve created a FREE back-of-camera cheat sheet that I’m so excited to share with you. It’s a resource that I would have loved to have when I wanted to learn how to shoot in manual mode and I hope it’s a tremendous help for you. You can access it here and I’ll send it right to your inbox. You’ll just take a picture of the cheat sheet with your camera and, if you do so right after you format your card, my workflow will be just one click away on the back of your camera for easy reference.
Recap
Learning how to shoot in manual mode can be overwhelming if you don’t have a good system in place. I hope this blog paired with the back-of-camera cheat sheet gives you the information and workflow you need to get yourself started. Keep your camera handy so you can easily grab it to practice! You’ve got this!
What’s Next?
Up next is the grand finale of The Very Beginning! We’ll review the highlights from the series and give you the resources you need to start transforming your photography. Stay tuned!
If you enjoyed this post, you may also love:
YES PLEASE!
Getting ready for your next PCS? This resource is for you! Download the guide for five actionable ways to set yourself up for success at your next assignment.
5 Ways to PCS-Prep your photography business
Getting ready for a PCS?
Getting ready for a PCS?


free download!
I HAVE A LITTLE SOMETHING FOR YOU!
I've been navigating military life with my family since 2008. In that time, I went from a full-time classroom teacher to an online course designer to a photographer. Actually, I still teach a little math on the side because I just love it too much!
Through it all, I've discovered how passionate I am about connecting with military families. Whether it's taking photos at a retirement ceremony, coaching a fellow milspouse photographer, or just grabbing coffee with a new squadron friend, I love this community. And as a teacher at heart, I'm excited to use this space to share what I've learned about business and life with you.
I'M ERIN.
Hey there!


